


How to Build a Survival Tin

You will want to have items to meet your basic survival needs such as water, fire, shelter, food, and signaling. Your environment will dictate some of what you put in your kits depending on the available natural resources or the dangers you may face.
Always understand along with this kit you should have your basic EDC or Every Day Carry items such as a Knife, Flashlight, Cell phone, etc. These small kits are more so to back up your main survival gear as a redundancy. Lets say you were to loose your fire making device- you could then go into this survival tin to make fire. Another example would be your compass. A small compass will allow you general navigation but also could use to ensure your primary or larger compass is reading accurately. This is a more realistic approach.
1. Tin
2. Cordage
3. Sewing Kit: Just grab a needle and thread from your home sewing kit. Wrap the thread around the needle and add a few safety pins
4. Photon Light
5. Small Compass
6. P-38 Can Opener
7. Whistle
8. Tinder Tabs
9. Lighter and Matches
10. Water Purification Tablets
11. Fishing Kit
12. Folding Razor Saw
13. Signal Mirror
14. Snare Wire
15. Waterproof Paper and Pencil
16. Small Beeswax Candle
These items are just a representation of recommended items. Let us know what items you would add to your survival kit.
Some links are affiliate links that provide a monetary return based on purchased items.
5 Steps to Prepare to Survive in the Wild by Tiffany Clough

The internet is full of guides on how to stock up in the event of a disaster confining you to your home. There are countless guides telling you how to stock up on cans, what tools to have nearby, how to protect your home from potential danger and so on. The only problem is that most survivalist guides tend to focus more on the event in which you are at home and continue to bunk up in your home when the event of a disastrous time hits. But what should you do if staying at home isn’t a possibility, actually, when those hard times hit? What if the event catches you in the wild, or you have to flee your home and other urban areas to head out to the safety of a forest or the mountains?
For the purpose of covering all our bases, we decided to put together this guide to act as a counterpart to the wealth of information on how to disaster-proof your home. Today we will share with you the tips we would advise anyone to follow in order to be prepared for anything, including the possibility of having to head out into an environment where home comforts aren’t really an imaginable option.
1. Have 2 sets of ‘essential’ items ready
You may find often times lists of essential items every survival expert will advise you to have with you for emergency times. All survivalist sources tend to be abundant in this type of lists and advice, but you should learnt to properly differentiate between them. In all honesty, the list of what you need for staying at home is completely different than the list of items you’ll need for heading out into the wild.
Furthermore, for the outdoors scenario you should think about 2 separate checklists to prepare. One is for the items you should have in your car to be ready to go if the time comes, and the other one is for smaller items to have on your person at all times. If you have a family, then the list of small items (from pocket knife to compass and water purification straw) should contain the entire set for each family member, just in case you get separated. This is a good example of an items list for survival preparedness to have on your person.
For your car, assuming you have one (and we recommend you to have a bulky, sturdy one which can handle rough terrains), you need a separate list of essentials, including a sleeping bag, maps, a rifle (or gun), ammo, different tools needed to cut wood and build a shelter (handsaw, cable, rope) and so on. Just make sure you stock up on both types of items needed out there, and don’t just focus on large items and neglect the small pocket essentials or vice versa.
2. Try to train yourself to be better with maps, or car repairs etc.
This next step is simple: the maps you’ve stored in your car won’t actually do you any good if you’re not good (and fast) at reading them and using them on the go. Whether you need to create a good road plan for travelling in your car or by foot, you need to be experienced in map reading before you actually come to depend on it. Otherwise, you will over or underestimate distances and may end up making some unfortunate strategic mistakes.
3. Get better at hunting and learn more about wildlife
The other thing you should learn and practice in advance is hunting, for obvious reasons. Don’t just focus on traditional hunting, using a rifle, but make sure you have other options as well, and also the dexterity and experience of wielding them. Whether it’s a crossbow or simply using whatever knife and rock you have in your hand, you should always be able to acquire food. Also look into what types of edible plants live in the wild area nearest to you, and learn to process them, or the ones you should stay away from (poisonous mushrooms, for example).
4. Have a plan (and a plan B as well, if possible)
Since we mentioned earlier how important map reading skills are when devising a sound plan, we should also mention that having a plan is rather essential. We can’t advise you about it since it would depend on the circumstances, but remember this: don’t waste time panicking and being upset over whatever happened. Is the best option you have staying in the wild for a few weeks? Is your best option reaching another area, a few days away? Whatever the best option is, figure it out fast and start working towards it. Also have a plan B, just in case the first one turns out to be not such a good idea.
5. Increase your adaptability to temperature changes
This last step of preparing for surviving in the wild for a while refers to the clothes you plan on taking with you. In order to avoid sickness and extreme discomfort, you need to avoid too many changes in your body temperature. Think of the list of clothes and items to take with you with that in mind: think layers for extra heat, a little at a time, as well as protecting yourself from intense sun exposure. Also take with you a rain mac (or poncho), which can be used for its intended purpose, as well as double up as a curtain to hang up over your shelter in case of too much sun and heat.
BACK HOME Kit- Black Scout Concepts
In this episode, we show you the items we feel is a great start to building a survival kit. These items can be remembered by the acronym we created called "BACK HOME" and will help you when compiling these items. We hope you can take something from this and thanks for watching!
SEE THE REVIEW OF THE KNIFE FROM THIS VIDEO HERE: https://www.youtube.com/watch?v=vtEBdrtnUIs&index=16&list=PLLM2XF56J5XMqMvT3kt2gApFT8l1crhzC
SEE THE REVIEW OF THE SHEATH HERE: https://www.youtube.com/watch?v=qYhGfX471Uw&index=33&list=PLLM2XF56J5XMqMvT3kt2gApFT8l1crhzC
Get the gear featured in this video at the below links:
Ferro rod:
http://www.amazon.com/gp/product/B00LG7D0QC?ie=UTF8&camp=1789&creativeASIN=B00LG7D0QC&linkCode=xm2&tag=blacscousurv-20
Bic lighters by the box: http://www.amazon.com/gp/product/B00IMMIWTE?ie=UTF8&camp=1789&creativeASIN=B00IMMIWTE&linkCode=xm2&tag=blacscousurv-20
All Weather Blanket: http://www.amazon.com/gp/product/B002CQUA28?ie=UTF8&camp=1789&creativeASIN=B002CQUA28&linkCode=xm2&tag=blacscousurv-20
Sgt. Knots Paracord: http://www.amazon.com/gp/product/B007RCPFSG?ie=UTF8&camp=1789&creativeASIN=B007RCPFSG&linkCode=xm2&tag=blacscousurv-20
Knife: http://www.amazon.com/gp/product/B009O01H0Y?ie=UTF8&camp=1789&creativeASIN=B009O01H0Y&linkCode=xm2&tag=blacscousurv-20
Headlamp: http://www.amazon.com/gp/product/B00GCGIGHK?ie=UTF8&camp=1789&creativeASIN=B00GCGIGHK&linkCode=xm2&tag=blacscousurv-20
Compass: http://www.amazon.com/gp/product/B000FEUCRW?ie=UTF8&camp=1789&creativeASIN=B000FEUCRW&linkCode=xm2&tag=blacscousurv-20
Metal Canteen: http://www.amazon.com/gp/product/B0093IS19C?ie=UTF8&camp=1789&creativeASIN=B0093IS19C&linkCode=xm2&tag=blacscousurv-20
Emergency Signal: http://www.amazon.com/gp/product/B004IANTB0?ie=UTF8&camp=1789&creativeASIN=B004IANTB0&linkCode=xm2&tag=blacscousurv-20
http://www.amazon.com/gp/product/B00020SE1A?ie=UTF8&camp=1789&creativeASIN=B00020SE1A&linkCode=xm2&tag=blacscousurv-20
http://www.amazon.com/gp/product/B00E8DJXK8?ie=UTF8&camp=1789&creativeASIN=B00E8DJXK8&linkCode=xm2&tag=blacscousurv-20
Website: http://www.blackscoutsurvival.com
Twitter: @Black_Scout
Facebook: https://www.facebook.com/pages/Black-Scout-Survival/664083850312780?ref=br_tf
Instagram: http://instagram.com/blackscoutsurvival
Interview with Doom and Bloom
 |
| Dr. Bones and Nurse Amy |
Here are the link to check them out:
The Tiered System and How It Can Help You Develop Your Kits

I want to introduce a tiered approach that I take that may simplify things. This may help you in development of your kit(s). First you will need to know what event's your planning for. This will determine much of what you pack and how many of the tier's I'm going to describe.
Tier 0-Knowledge: Your most important tier. This may involve paying for training which is why I include it in the tiered system. You may find yourself in a situation where all of your gear has been lost or taken and you have to improvise and your life depends on your resourcefulness. Knowing how to start fires, build shelter, procure food, and make weapons should be part of your skill sets.
Tier 1-EDC/SERE Kit: This includes your pocket knife, multi-tool, wallet, key ring, flashlight, cell phone, and so on. Your cutting tool (pocket knife) being the most important since its the hardest to replicate in the wild and it can accomplish many survival task. It doesn't matter if its a swiss army knife or a $300 tactical folder. It will most likely be your only knife with you when things go sour- since its difficult to get away with a fixed blade in your day to day life. Your Pocket Survival Kit or SERE kit as I like to call it. Typically if you have this and only this; you have had to leave your main pack behind. More than likely your surviving, evading, resisting, and escaping (SERE). These items will be small tools that will aid you and your knowledge (tier 0) should do the rest.
Tier 2-72 Hour Kit/EDC Bag/Get Home Bag: This kit encompasses those items that you have in a small bag. It could be in your vehicle, your EDC Bag, or 72 hour kit. These are larger and more comprehensive tools than whats found in your EDC or SERE Kit. You want to focus on sheltering devices like space blankets, small sleeping bags, mylar bivvy sacks, and heat sources for maintaining core body temps (like fire starting equipment). You will also want to have food stuffs like jerky/MRE main meals/granola bars. Items that don't require cooking. Have some water, a way to carry it, and a way to find or get more potable water on the move. Boiling is not the best option when your trying to get somewhere. So I would say to carry small purifying straws or water purification tablets. Small trauma kits would also go into this category. A small fixed blade knife and multi-tool could also serve you well. This kit is best designed to sustain you for a few days to get you to your desired location. You don't want to have to stop and build shelters, cook food or boil water. Your mission objective is to get to a safe place in the shortest amount of time. We will have a article published soon on "Defining the 72 hour kit" and this will go over the criteria for kits of this application.
Tier 3-72 Hour Kit and Beyond/BOB: In my opinion your BOB is not a 72 hour kit. A BOB is gear that you may need to survive in an unknown situation. Mainly because your having to "bug out" from your safe house and move away from danger. Could you use your BOB for a 72 hour kit? Sure, however I like to separate mine because my BOB is to extensive to carry everyday and have within an arms reach. This kit would also include larger firearms like rifles and more ammo, food acquiring equipment, cooking equipment like stoves, larger scale comm systems (HAM radios), major sheltering systems (down sleeping bags, tents, hammocks, and tarps), comprehensive medical kits, an environmental gear such as a change of clothing, larger buschcrafting tools like saws, pack-able axes, and larger knives. Again, this system is for the unknown, when you've had to leave your house, bug out location, or safe house and you may be placed in a survival situation Field craft skills are also a must for this scenario.
The water gets muddied on kit applications. Many people run systems together and this will leave you in a bad position. It's better to have yourself set up for success by developing systems around these types of scenarios. Also not that these kit items can be modular. Meaning that you don't need a flashlight for every tier. You will already have it on you and it can be used for that next tier. We will try and do a video on this subject in the future- if you guys are interested.
Springtail Solutions MPAC Review

If your like me and own a jeep you know storage is at a minimum. While surfing the web I came across the MPAC from Springtail Solutions. This is a uniquely designed system that marries a few different useful features.
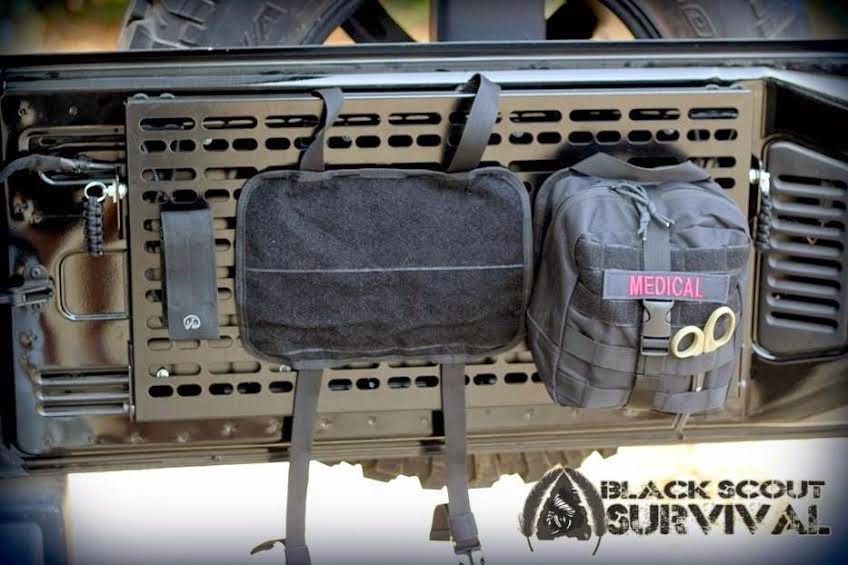 |
| There are dynamic straps attached to the velcro panel to ensure the pouches stay on in rough terrain |

Probably the most awesome feature is that the MPAC folds down into a table. It is suspended by 550 cord and can be adjusted. I've already used the table numerous times and truly don't know how I lived without it.

 |
| Leatherman attached to the MPAC grid |
I love the organization the MPAC offers. The folding table has been helpful almost on a daily basis. I highly recommend the MPAC if you have an FJ Cruiser or Jeep JK.
Check them out at: http://store.springtailsolutions.com/JK-Rear-Door-Folding-TrayMOLLE-Panel-Combo_p_29.html
Training: your most important piece of survival "gear"

When I say training, I don't specifically mean going to attend training (although I highly recommend it). I believe experience is just as important as training. I know when I've faced a situation that I have faced before I generally know how to handle it. Why? Because I've already dealt with it before.
A saying that we use in the military is that "you will always default to your level of your training". Many people think that when they face a situation they will "rise to the occasion". As many have found out- that's not the case. You will always resort back to your level of training.
Lets look at it from a fitness standpoint. Do you believe that if you've been living an unhealthy lifestyle; that you would be able to bug out on foot on a ten mile ruck to get to your bug out location? I'm sure there are many out there that believe that they will. I know better. Don't let your fantasies get the best of you. If you have never pushed yourself to that physical capacity; then more than likely you will not when it becomes reality.
There are endless survival resources online. You could spend hours online looking at the plethora of "survival experts" on YouTube. If moneys tight and that is the only option you have; its better than nothing. I would encourage you to get out and practice those skills and gain that "experience" like I stated above. By failing to do certain things you may learn how to do them right. An example of this is friction fire. You may fail a hundred times before you get it. But the experience will help you. This may even lead you to shortcuts or better methods of doing things. You can also receive free training from the American Red Cross.
If you can afford to spend some money, I would suggest getting training in the areas below:
- wilderness survival
- firearms/tactical training
- a fighting art (i.e. krav maga, ju-jitsu, boxing, wrestling, etc...)
- CERT/FEMA
- Gardening
- Welding
- OnPoint Tactical Urban Escape and Evasion Class
SERE TIP #33

L.T. Wright Genesis Review

Over my course of knives my preference has changed like most of you. As of now I typically carry a "one-tool" option full tang fixed blade made of some super steel and pretty thick blade. Now most of the time when backpacking, camping, hunting, fishing, etc... this is overkill. Most camp chores need little more than a four inch blade. When bushcrafting we tend to carry knives, axes, and saws. With this combination your trading the weight from a "one-tool" option to a few tools. Typically because this is when your life is not in danger and you practicing your skills. Or if you choose to operate like those frontiersman a few years back (okay maybe for than a few years).
In my survival load out I tend to carry a few knives. One being a 4 inch and that tends to pull the brunt of the work as I've said before. I've wanted to try a dedicated bushcraft knife to really see how well it performed. For this challenge I chose the L.T. Wright Genesis. The Genesis is about as bushcraft as you can get when it comes to knives.
Here are the Specs:
Overall Length: 9"
Sharpened Edge: 4.25"
Steel: 1/8" A2
Grind: High Polished Scandi
Handle: Green Micarta
Out of the box the knife is a piece of art. Its truly a beautiful piece that looks like an heirloom piece that will be passed down generations. The Scandi grind is extremely sharp and holds an edge very well. Literally the hairs jumped off my arm as I skimmed it with the blade. This scandi grind has a super high polish with a 0 degree edge. This makes for extremely smooth cuts.
I was somewhat skeptical about the strength of a 1/8" knife but my skepticism quickly faded after the tons of batoning I delivered with the knife. The A2 steel was a good choice for this knife and solid design proves that the Genesis is a formidable woods blade.
The handle is a "broomstick" style (basically that its rounded with a straight shape) built from aesthetically pleasing green blasted micarta. Again seeing the knife may lead you to believe its going to be uncomfortable; it was anything but. This has to be one of the most comfortable knives I've owned. It has a full grip even though its paired with a thin blade. You have plenty of real estate to get a solid hook up when using the Genesis. There are also "thumb scallops" on the handle that I've not seen before. They allow the user to hold the knife comfortably in a variety of methods. There is also a brass lined lanyard hole at the rear of the knife.
The back edge of the knife has a 90 degree spine built ready to shave flaming shards off of a ferrocerium rod. This is also beneficial when scratching off a fine tinder pile from a piece of fat wood.
Securing the Genesis comes by way of a very gorgeous leather bushcraft pouch. This sheath can be suspended by a dangler system or ride high with conventional loop. There is also a firesteel loop that will hold up to a 3/8" ferro rod.
Overall I really like the feel, looks, and performance of the Genesis. If your in the market for a dedicated bushcraft knife I recommend going over and checking them out by clicking HERE.
All Matches Aren't Created Equal
 |
| Left to Right: UCO Stormproof Match, British Lifeboat Match, Hurricane Match, Coghlans Wind/Waterpoof Match, Strike Anywhere Match (waterproof treated), Coghlans Waterproof Match, MRE Damp Proof Match |
Sometimes you need an ignition based flame for lighting oil lamps or candles. Matches with a long burn time and that can withstand high winds, at times are superior to lighters.
I've used a variety of matches over the years and it has came down to to styles that I tend to keep in my kit. Those are Strike Anywhere Matches and the UCO Stormproof Match. Strike Anywhere style matches are good when you may have lost your striking pad. Outside of that they tend to fair poorly against many others. My preference goes to the UCO Stormproof Match and we will be discussing them today.

The matchstick is somewhat larger than many others on the market. I like that it allows me to keep my hand a little farther away from what I am lighting. You can trim them to put them into your survival kit or standard match cases if need to.

The case is super strong. I've seen a few videos where this case is ran over by a truck with no failures. I like survival orange, but it can also be had in safety yellow and military OD Green.
If your looking for matches I highly suggest you grab some of these.
Nickel Knife


check this product out by clicking HERE
Triple Aught Design- Fast Pack EDC

Today we will be discussing the Triple Aught Design Fast Pack EDC. It's a high capacity day pack- hence the name EDC or everyday carry. This pack combines some features that one would expect from a field pack with additional elements that would be useful in your commute to the office.
 |
| Left: Fast Pack Litespeed Right: Fast Pack EDC |
The exterior of the pack has PALs webbing. There are also top and bottom compression straps. These features give you plenty of options to mount gear externally. Things such as ropes, sleeping bags, and tarps to name a few.
 |
| Transporter tail used to carry M4 Carbine |
 |
| Flashlight Cave with GPS Deployed |


The pack is a great design for wear. Its extremely comfortable and with waist belt and sternum strap fastened- the pack pretty much molds to your body. This is important for hiking or moving fast through the wilderness. All the materials used are high quality and will give you years of service.
Check out more information by clicking HERE
How to Build a Fire Can

There are a ton of fire starting stuff on the market. They tend to cost money which you would rather spend on other gear. So why not make the stuff at your house- like vaseline and cotton balls. While they are excellent you may need something a little more substantial. Well we are going to help you with that today.
This is the Fire Can and can be made by a few household products.

- A tight sealing can such as: a shoe polish tin, air pellet tin, Altoids tin, or anything similar
- Cardboard- preferably the ribbed kind
- A candle
- Scissors
- Lighter or match to light the candle
- You will first cut your cardboard into long thin pieces that are as wide as the can. If its ribbed cut across the grain. This will leave pockets that will hold the wax

2. You will then coil it around in the tin very tightly until the entire tin is filled with coils of cardboard.

3. Then light the candle and let the melting wax drop into the can saturating the cardboard. make sure it
fills up the can and soaks into the cardboard. Stop once its been filled to the top and allow the wax to
harden.
When using the fire can you will need to light the edges of the exposed cardboard. Do be careful because the can will become hot. Essentially this is a waterproof tinder element that can be used over and over again. It can also be used to start fires and then put away to be used again. Seeing that most of us have this type of gear sitting around the house its pretty much a free fire starting element. Make a few up and throw in your pack for your next adventure or your bug out bag.
Subscribe to:
Posts (Atom)